How can we help you?
How do I set up Activity Zones?
To create an Activity Zone, navigate to Detection settings within your Hive View settings menu.
By default Activity Zones will be turned off so tap the Activity Zone option to turn them on. The ‘Create Zone’ option will now appear, tapping this will take you to a live view from your Hive View camera, where you can create your zones.
Simply drag across the grid to create a square, which will be your Activity Zone. The smallest size for an Activity Zone is 1 square and the largest size is all of the squares (or the entire field of view). You can have up to 4 different Activity Zones, which will always be square in shape but they can overlap. This means they should be flexible enough to cover most use cases.
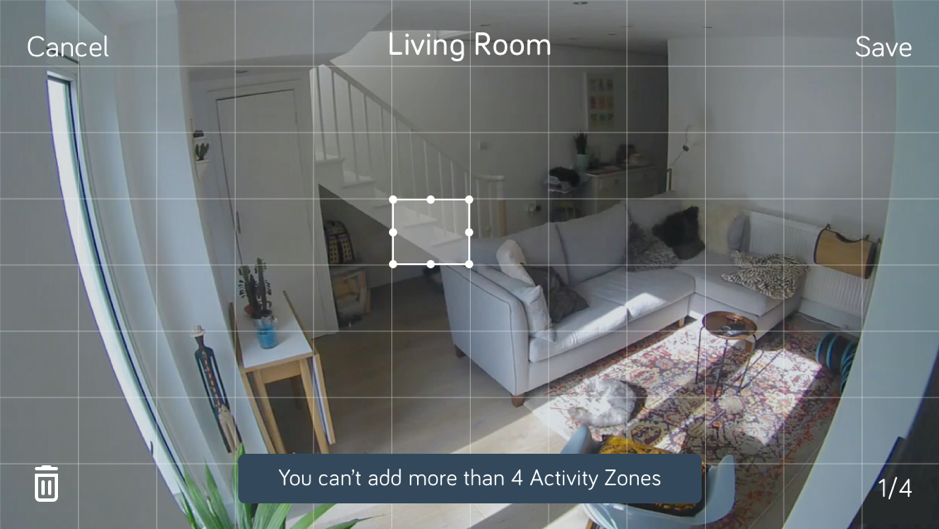
If you’re not happy with an Activity Zone you can resize it once created by dragging from it’s edges. You can also delete an Activity Zone by highlighting the zone you want to delete and then tapping the bin icon.
Once you’re happy with the zones you’ve set up just hit save on the top right of the screen and you’re good to go! Tapping ‘Cancel’ will discard any changes you have made and will take you back to the Detection settings screen.
Hive Hint: Sensitivity options for movement detection (low, medium, high) will still apply to all of the created zones.
By default Activity Zones will be turned off so tap the Activity Zone option to turn them on. The ‘Create Zone’ option will now appear, tapping this will take you to a live view from your Hive View camera, where you can create your zones.
Simply drag across the grid to create a square, which will be your Activity Zone. The smallest size for an Activity Zone is 1 square and the largest size is all of the squares (or the entire field of view). You can have up to 4 different Activity Zones, which will always be square in shape but they can overlap. This means they should be flexible enough to cover most use cases.
If you’re not happy with an Activity Zone you can resize it once created by dragging from it’s edges. You can also delete an Activity Zone by highlighting the zone you want to delete and then tapping the bin icon.
Once you’re happy with the zones you’ve set up just hit save on the top right of the screen and you’re good to go! Tapping ‘Cancel’ will discard any changes you have made and will take you back to the Detection settings screen.
Hive Hint: Sensitivity options for movement detection (low, medium, high) will still apply to all of the created zones.
Featured Articles
- How can I update my Hive View or Hive View Outdoor firmware?
- How do I view my Hive View or Hive View Outdoor HD live stream?
- How do I zoom on Hive View or Hive View Outdoor?
- I haven't received an activity notification for my Hive View or Hive View Outdoor, what should I do?
- How will I receive activity notifications for my Hive View and Hive View Outdoor?
- How does the time zone work for Hive View and Hive View Outdoor?
- How do I turn the chimes off on my Hive View or Hive View Outdoor?
- How do I turn the lights off on my Hive View or Hive View Outdoor?
- How do I turn activity notifications on or off for Hive View or Hive View Outdoor?
- How do I remove Hive View or Hive View Outdoor from my Hive app?
- How can I change the format in which I receive activity notifications for my Hive View or Hive View Outdoor?
- How can I amend my detection settings for Hive View or Hive View Outdoor?
- I've received a system notification saying my Hive View or Hive View Outdoor is too hot, what should I do?
- The Wi-Fi in my home is slow after installing my Hive View or Hive View Outdoor?
- What do the different lights on my Hive View and Hive View Outdoor mean?
- Will my Hive View or Hive View Outdoor switch off if my broadband is turned off or stops working?
- I can’t find the Hive View or Hive View Outdoor file I downloaded
- Why am I not getting activity detected on my Hive View or Hive View Outdoor?
- Why didn't I receive an image of the person seen in my person activity notification?
- How do I reset my Hive View Outdoor?
- What are Activity Zones and what do they do?
- How do I turn my Hive View or Hive View Outdoor on/off?
- What is the Play A Sound feature?
- How do I use the Play A Sound feature?
- How does 'Grab and Go' battery mode work on Hive View?
- I've received a system notification saying my Hive View battery is low, what should I do?
- How do recordings on my Hive View and Hive View Outdoor work?
- Where are my Hive View and Hive View Outdoor recordings stored?
- How do I change the Wi-Fi router or network that my Hive View or Hive View Outdoor is connected to?
- How do I switch privacy mode on/off for Hive View and Hive View Outdoor?
- How do I download my Hive View or Hive View Outdoor recordings?
- How do I talk through my Hive View or Hive View Outdoor?
- The video recording for my Hive View or Hive View Outdoor is repeatedly interrupted or takes a long time to start up, what should I do?
- My Hive View is showing as offline in the Hive app, what should I do?
- What happens if I decide to cancel my Hive Video Playback Membership?
- An activity event wasn't detected by my Hive View or Hive View Outdoor, how do I resolve this?
- What can I do if my Hive View or Hive View Outdoor isn’t working?
- How do I reset my Hive View?